Proper milk frothing creates microfoam with tiny bubbles that integrates smoothly with espresso.
Temperature, technique, and milk type all matter. This guide covers the fundamentals for creating cafe-quality foam at home.
What Equipment Do I Need To Make Awesome Latte Art?
Firstly, you must prepare all your equipment and ingredients needed to make awesome latte art. The equipment and ingredients you’ll need are:
- An espresso machine
- A steam wand
- A milk jug
- Fresh milk
- And some good coffee beans, duh.
You might be thinking, “I won’t spend my entire stimulus check on these fancy equipment.” And you don’t have to. You can get a quality espresso machine and wand for well under 150 bucks.
From there I’m assuming you have milk and coffee beans. And if you don’t, how do you wake up in the morning?
How To Get Milk Frothing Right
Once you have all your necessary ingredients, it’s time to cover some barista fundamentals.
Hold The Cup Comfortably As You Pour
You’d be surprised how many baristas get this basic principle wrong. This won’t make or break your coffee, but it ensures that you enjoy your new hobby, or job, instead of standing in a way that kills your back.
Different schools teach different ways of standing and holding the cup. But for me, the most comfortable way is to stand up straight and bend your non-dominant arm at the elbow. You can always work from here if it doesn’t make you comfortable, but it’s a great starting point.
Your Speed Of Pouring
Pouring slower will create bolder lines while pouring fast will create finer and more delicate lines. When starting out, you want to penetrate the espresso crema from high to ensure that your espresso is well balanced throughout your cappuccino.
Your Proximity To The Cup
When making coffee drinks or espresso drinks, start high and work your way down.
Think of it as a painting. Pouring from high gives you a canvas to paint on. From here, you can draw any design that tickles your fancy because you’ve already created a clean canvas.
Pouring from high gives you a nice base, and from there, the sky’s the limit. You can paint a heart, flower, or bear.
The Placement Of Your Jug
The sprout of your jug determines where your latte art will take place.
The place you start pouring will determine the tip of your design, not the middle. Most beginner baristas and hobbyists make this mistake, and their design looks weirdly shaped and off-center.
So if you’re pouring a heart, don’t pour straight down the middle. Rather place your jug slightly off-centre and your heart will be centered.
Step 1: Pull A Shot Of Espresso
Pulling a quality shot of espresso is crucial to making awesome latte art. If your shot is too weak, then your drink will look and taste like pure milk. Too strong and your guests will question if you’ve added milk in the first place.
To pull a quality shot of espresso, you must first preheat your machine, portafilter, and cup. Preheating your cup will ensure your drink stays warm for long. Before you do anything, fill your cup up with boiling water and let it sit until your espresso machine is ready.
Before you pull your shot, you must first pull a blank shot. This means running hot water through your machine and portafilter for a few minutes.
Once you’ve pulled a blank shot, it’s time to grind your coffee beans. Never buy ground coffee and never grind your coffee beans ahead of time. Coffee is most fresh right after it’s been ground. After that, it starts aging rapidly due to oxidation. One hour after you’ve ground your coffee beans, it’ll be a shell of its former self.
Aim for the consistency of sea salt. Too fine and it’ll over-extract, tasting bitter, burnt, and strong. Too coarse and it’ll taste watery. I suggest holding some sea salt in one hand and your ground coffee in the other. It doesn’t have to be identical, but similar.
Scoop 14-18 grams of ground coffee into your portafilter and pack them down with a tamper. Don’t have a tamper? Neither do I. I use a tablespoon. It’s not as effective at packing down your grounds, but it gets the job done.
Lastly, place your portafilter in your espresso machine and throw the hot water you used to pre-warm your cup away. Place the cup under your portafilter and start pulling.
It would help if you timed your pull. Start with 25 seconds and work from there. If your shot is too strong, then go down to 20 seconds. Too weak? Then increase your pull to 30 seconds.
Now that you have an excellent base to work from, it’s time to steam your milk.
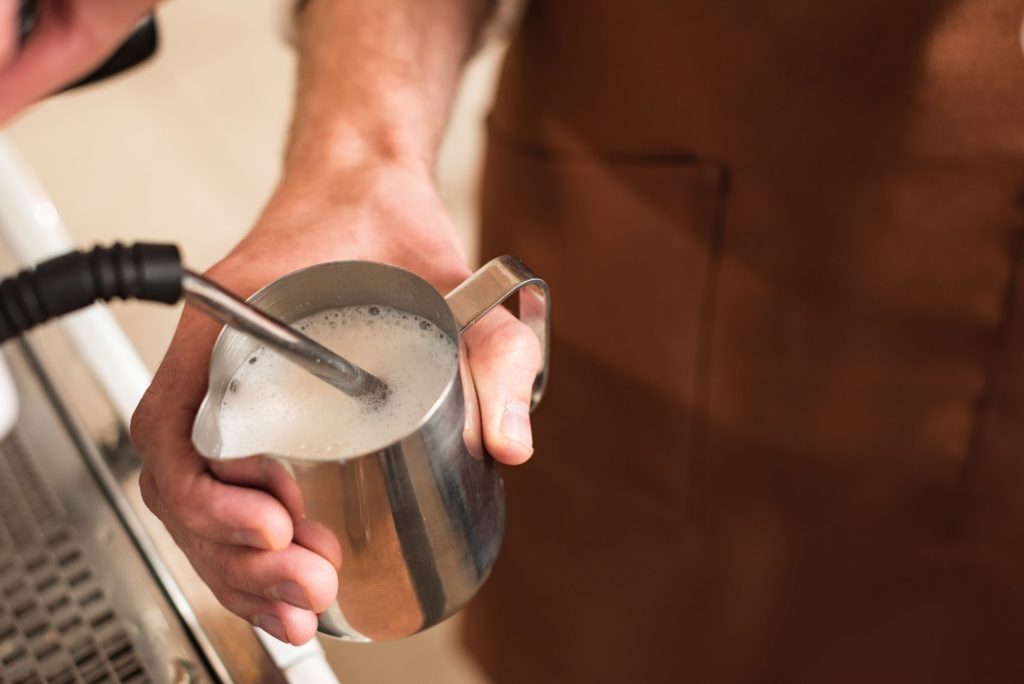
Step 2: Steam Milk With A Frothing Wand
Steaming milk properly is the most important part of making good latte art.
Firstly, get a jug, or a pitcher like most coffee aficionados call it and pour some cold milk in it. Whole milk, non-dairy milk, non-fat milk, and skim milk all work for making great latte art. But if you’re not lactose intolerant, I suggest sticking with good ol’ whole milk.
Don’t add too much cold milk as you’ll end up not using it and throwing it away. For cappuccinos, only use 8 ounces of milk. If you’re making for two, double it. But be sure to leave some space on top for the milk to rise. When steamed, milk will explode in volume and create large bubbles.
Next, purge your ward for 5 seconds. This gets rid of all the gunk and old milk foam that built up when you made your last cup of coffee. And nobody wants old milk in their cappuccino or macchiato, regardless of how nice it looks.
Insert your ward into your milk, but not too deep or you might burn it. Aim for a hissing noise, similar to a snake. When you hear this, you know you’re steaming your milk properly. Depending on your ward and how thick you’d like your foam, aim for 30 to 40 seconds.
Now that you’ve streamed your milk, it should have the consistency of melted ice cream.
Step 3: Tidy Up Your Froth Milk
Now that you’re finished steaming your milk don’t start pouring immediately. Tap your pitcher on the table several times while swirling it. This is what I like to call, tidying up your hot milk. It removes all bubbles, making your pour much easier.
Step 4: Tilt Your Cup At 45 Degrees
Most newbies hold their cup straight up and pour. By doing this, you aren’t creating a base to work from. This can cause your latte art to end up thicker than normal, which can hide any delicate and fine lines you intend to create.
Instead, create a base first. Hold your cup at 45 degrees and pour till halfway. This base will allow you to “paint” any design you want.
Once you’ve filled your cup or coffee mug halfway with hot milk, start holding it upright.
Step 5: Adjust Your Pour
Now that you have a base to work with, hold your cup upright and start pouring high and fast. From here you can slow down and lower your pitcher closer to your cup.
You never want to raise your pitcher while pouring because this will mess up your design
Starting high and fast will get you a nice crema and ending low and slow will allow you to create detailed, delicate designs like the bear, lion, and flower.
5 Common Milk Frothing Mistakes
Now that we have a basic understanding of how to pull a quality shot, stream milk properly, and pour it properly, it’s time to cover some mistakes you’ll make along the way.
1. Streaming Milk For Too Long or Too Short
To create an awesome latte painting, you’ll need milk that isn’t too thick so it hides your delicate lines, but not too thin that that’s no design at all.
You probably won’t get your milk to the perfect texture the first time, but keep practicing and timing your steam. There is no shame in your cappuccino looking like a regular coffee the first time.
But with enough practice and timing, you’ll get a feel for how long you should steam your milk to create the perfect texture.
2. Lifting The Mug Away While Pouring
Pouring from a low point creates finer lines while pouring for a bit higher creates thicker art.
Most beginners will pour from a low point and work their way up. But this ruins your latte art because you’re creating thin lines, but then pouring from high and destroying those lines.
Make a mental note to never raise your hand as you’re pouring.
Stick to pouring from high and working your way down. This creates thicker art first and ends with delicate lines.
3. Pouring Too Fast
When you’re creating the foundation for your cappuccino or macchiato, you want to pour faster than when you’re ending, but not too fast. Pour your frothed milk straight down the middle and once your base is set, start pouring slowly.
Push the start of your design towards the back of the cup, so it’s off-center. This ensures that your latte art starts at the brim of the cup and centers in the middle.
If you pour too fast, your latte art will start in the middle of your cup, leaving a hole in your design.
4. Waiting Too Long To Pour Frothed Milk
Your milk won’t pour itself.
The longer you wait to start pouring, the less silky your steamed milk becomes, and it starts separating into different layers. One will contain watery milk, and the others will be pure blobs of air.
When you create your art after waiting a few minutes, the bottom half of your cappuccino will be watery, and the top half full of larger bubbles and foam.
To avoid this, simply tidy up your milk and start pouring immediately. This will give you a consistent, creamy cappuccino, r. atNot one filled with air bubbles.
And by far, the mistake that separates professional baristas from hobbyists.
5. Not Practicing Enough
How do you plan on designing latte art like someone who’s been working in a coffee shop for over five years?
Practise is important. And what’s more important is practicing the basics.
Beginner latte artists want to learn the most advanced designs, and I can’t blame them, but leave those designs for later.
First focus on the bare basics like;
- Which coffee beans work best for latte art
- How to grind your coffee beans to the perfect consistency
- Steaming your milk properly
- Timing your steam
- And basic pouring skills.
Nobody is born a latte artist. It’s something you must work on for years. Even the guy at Starbucks who draws anything you want had to practice. And it’s not something you can learn in school, so it’s up to you to get better.
If you break down latte art, it’s simply a few basic skills put together. Skills like;
- Hand to eye coordination
- Attention for detail
- Having a steady hand
- And slowing down the longer you pour.
That’s it!
Once you have those basic skills down, you can learn any design you want relatively quickly.
But you might be thinking, “how can I practice latte art without spending a ton of money on milk and coffee beans. Also, I’m not a big coffee drinker, I just want to learn.”
Well, I have some great news for you.
Here’s a great way of practicing your latte art daily, even if you only drink one cup of coffee a day.
- After you’ve practiced your design, pour your coffee back into your pitcher.
- Stir it for a few seconds to recombine your milk and coffee.
- Pour some into your cup to resemble a shot of espresso.
- Let your milk and coffee concoction cool down for a minute.
- Steam it again.
- Practice your latte art again and repeat.
You can easily do this 4 to 6 times over before it starts affecting the texture of your milk. This way, you get to practice like a professional barista without wasting milk or coffee beans.
Now that you know how to practice without wastage let cover some common designs.
The Love Heart: By Far The Easiest To Learn

I always recommend beginners start off learning the heart.
It’s simple and easy.
Start by pulling your shot of espresso and steaming your milk.
When you’re ready to start pouring in the center. Start high, and as the milk goes underneath your espresso, penetrating the crema, start lowering your pitcher and controlling your design.
Once your cup is half full, stop for a second and continue pouring straight down the middle. You’ll see the shape of a heart appear and once your cup is full, pull through.
Pulling through will give your heart the curves it needs. And if you’re serving guests, it’ll show you pay attention to detail.
Rosetta: Takes Time To Master

The rosetta is the second design most people should learn. It’s the same as making a heart, but with a slight wiggle.
The rosetta works better with thinner milk, as it’ll look more defined and detailed.
Start by pulling a shot of espresso and steaming your milk. Next, start creating your base by pouring from higher than usual until your cup is half full. Stop, then start wiggling your pitcher back and forth and you’ll see the milk pour on the surface.
Start bringing the pitcher towards the base of your cup, raise your pitcher, and pull through.
I like the rosetta because it’s a more complex version of the heart.
A Bear: Fancy!

Designing a bear might seem intimidating and cute, but it’s quite simple.
For this design, you’ll need a toothpick to design the bear’s eyes, nose, and mouth.
Start with pulling your espresso and steaming your milk. Pour your steamed milk from high while wiggling your pitcher from side to side. Once your cup is half full, and your foundation is set, pour a big circle on the surface until your cup is ¾ full. Stop and pour a smaller circle below that until your cup is full.
So you’ll have a big semi-circle and a small circle below that. Simply take your toothpick, tip it into your coffee, and draw the eyes, nose, and mouth of the bear. Take some of the leftover foam and design the ears.
Voila! You’ve just designed a cute little bear.
Milk Frothing: The Final Word
After reading this guide, you have no excuse to not invite your family and friends over and brag about your awesome pouring skills. My favorite design is a heart. It’s simple, easy, and romantic. What’s yours?
Milk Frothing Guides
The Bottom Line
Here’s the practical takeaway after researching and testing this extensively:
Theory is great, but real-world application is messier. We’ve found that understanding the ‘why’ behind coffee science helps you troubleshoot when things go wrong—and they will. Your water, your beans, your grinder, and even humidity levels create variables that no guide can perfectly account for.
Start with the fundamentals in this article, but don’t be afraid to experiment. Some of our best cups have come from “mistakes” that turned into happy accidents. Coffee brewing rewards curiosity.