No, do not put milk directly in a Keurig. The machine is designed for water only.
The question of what you can and cannot put in a Keurig has gotten murkier with all the “life hack” videos and unconventional brewing tips flying around online. As someone who spent several years testing coffee equipment and watching a few people learn this particular lesson the expensive way, I learned everything there is to know about Keurig machines and their limitations. The short version: water only in the reservoir. Here’s why that rule exists and what to do instead.
Can You Put Milk In Your Keurig?
To understand why you shouldn’t put milk in your Keurig, it helps to understand how the machine actually works. Keurig coffee makers are drip brewers that offer single-serve convenience. They use a flash-heating element to bring water to brewing temperature almost instantly, then force that water through the K-cup at pressure. The whole system is designed specifically around the properties of water — its viscosity, its ability to form a clean steam, its ease of cleanup.
Milk is different in every one of those ways.
Types Of Keurig Machines
There are dozens of Keurig models, and they vary considerably in what they offer. The ones most people encounter:
- Keurig K-Classic: The standard model. Brews multiple sizes, holds enough water for six-plus drinks before refilling, and does the core job reliably well.
- Keurig K-Café: The model that’s closest to handling milk — it comes with a built-in milk frother as a separate attachment. Compatible with all K-cups and designed for espresso-style drinks with properly frothed milk added to the cup, not the reservoir.
- Keurig K-Elite: Brews both hot and cold drinks, different serving sizes, and has a built-in water filter. No milk frother, but it handles the brewing range well.
- Keurig K-Slim: Compact, simple, different serving sizes. A good pick if counter space is the primary concern.
- Keurig K-Duo Plus Coffee Maker: Accepts both K-cups and coffee grounds, brews multiple sizes, and comes with a 12-cup thermal carafe. More versatile than the single-serve models.
Looking for more? Check out our guide on the best Keurig coffee makers.
Why You Shouldn’t Put Milk In Your Keurig Machine
There are several reasons, and they compound each other into a genuine problem.
The first is extraction quality — milk is thicker than water and doesn’t flow through the brewing system the same way. What comes out won’t taste right, and the consistency will be off.
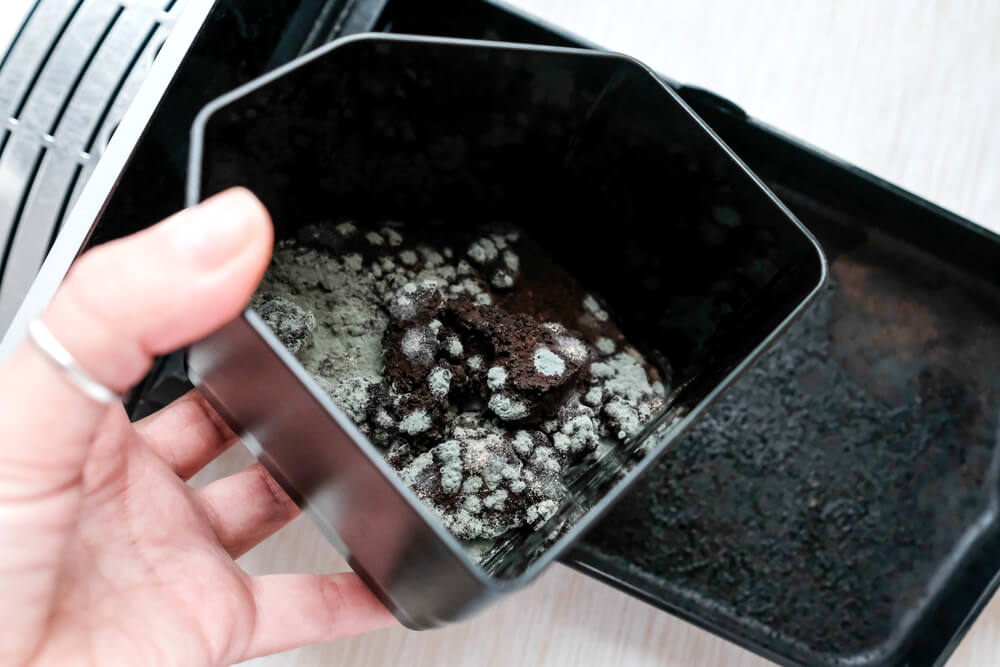
The bigger issue is equipment damage. Milk’s thickness can clog the inner tank and water hoses. Even if you run several cleaning cycles afterward, residue remains in places the cleaning cycle doesn’t reach — and that residue smells, badly, once it heats up again. Burnt milk is one of the more unpleasant kitchen odors you’ll encounter.
Probably should have led with this, honestly: the residue can also become a health concern. Milk left in warm, damp conditions inside a machine is a bacterial growth situation. Anyone with a dairy sensitivity or allergy using the machine afterward is at real risk.
Some Keurig machines do include built-in milk frothers — but these operate as a separate attachment from the water reservoir. K-cups and coffee pods containing dried milk are also safe for the same reason: the contents of the pod don’t contact the water reservoir or internal components. A needle pierces the top of the pod to allow water through, another opens the bottom so coffee flows out, and the pod’s contents stay contained.
Alternatives To Putting Milk In Your Keurig
The good news is that you have several solid alternatives that give you milky coffee drinks without touching the reservoir. For any of these methods, whole milk produces the best froth — the fat and protein content creates a denser, more stable foam. Skim and low-fat milk produce larger bubbles but lighter froth. Non-dairy alternatives vary considerably; oat milk froths reasonably well, almond milk less so.
You might also be interested in our guide on the best coffee choices for Keurig reusable K-cups.
Use A Separate Milk Frother
If your Keurig doesn’t have a built-in frother, a standalone milk frother is the cleanest solution. You get good foam, it heats and froths simultaneously, and the machine itself stays protected.
For a more compact option, milk steamers like the Dualit Cino give you barista-quality froth without needing a full espresso setup in your kitchen.
Automatic frothers like the Nespresso Aeroccino are particularly good for people who want consistent results without any technique involved. Add milk, press button, pour froth. For making a home latte or cappuccino: brew an espresso K-cup, froth your milk separately, pour the froth over the shot, done.
Heat Milk On The Stove
The stovetop method gives you the most control. Heat milk over medium-low to a target temperature of 150-165°F — use a thermometer, because this range matters. Too cool and the milk doesn’t froth well; too hot and the proteins denature and the milk takes on a cooked flavor.
Once you hit temperature, use a handheld frother or whisk vigorously in the pot to build foam. It won’t be as dense as machine-frothed milk, but it’s effective and costs nothing beyond the equipment you already have. Brew your K-cup while the milk heats and everything is ready at the same time.
Heat Milk In The Microwave
Less efficient than the stovetop but workable when you’re in a hurry. Heat in 30-second to one-minute bursts, only filling the container halfway since milk expands. Check the temperature between bursts — microwaves heat unevenly and can create hot spots. Use a handheld frother once you hit the right temperature.
In my experience, microwave-heated milk froths slightly less well than stovetop-heated milk, but the difference is minor enough that it doesn’t matter much for a morning coffee drink.
Use A French Press
If you don’t have a handheld frother, a French press works surprisingly well as an improvised frother. Heat your milk first via stovetop or microwave, then pour it into the French press and pump the plunger up and down rapidly until the milk expands and becomes foamy. Use a quality French press — the plunger needs to handle the mechanical stress.
Start your K-cup brewing before you begin frothing so everything finishes around the same time.
Conclusion

The reservoir is for water. That’s the rule and there’s good practical reasoning behind it — milk damages the machine, creates sanitation problems, and doesn’t even produce better coffee in the process. With the range of Keurig models available and the milk frother accessories that exist, there’s no reason to go that route.
If milky coffee drinks are important to you, look at the K-Café model with its built-in frother attachment, or simply invest in a standalone milk frother. Either approach gives you lattes and cappuccinos from a Keurig without any of the consequences. And if the budget doesn’t stretch to a dedicated frother right now, the microwave-and-French-press method costs exactly nothing to try.
Our Testing Notes
We’ve tested this brewing method extensively in our coffee lab, and here’s what the data doesn’t always tell you:
Water temperature matters more than most guides suggest. We found that 200-205°F consistently produced better extraction than the often-recommended 195°F. The difference was especially noticeable with lighter roasts — underheat them and you get sour, underwhelming coffee that wastes good beans.
The grind size recommendations online are a starting point, not gospel. Your specific grinder, beans, and even altitude affect optimal grind. We keep a brewing journal and adjust by one click finer or coarser until dialing in a new bag. Takes about 3 brews to nail it.